Most fishermen usually associate fly fishing to small artificial lures. This is true if you focus on trout species, fish that feed on nymphs and adult insects or even on smaller fish. Few anglers dare to experiment with bigger flies in the search for record trout at dusk or dawn. Big sized Rabbits, View more...Most fishermen usually associate fly fishing to small artificial lures. This is true if you focus on trout species, fish that feed on nymphs and adult insects or even on smaller fish. Few anglers dare to experiment with bigger flies in the search for record trout at dusk or dawn. Big sized Rabbits, Blondes, Marabou Muddlers, Bunny Leeches, Rubber Legs and Wooly Buggers are the kind of flies they carry in their pursuit. There are also some floating flies within this big-fly category: huge Chernobyls, bulky Bombers and Stimulators give fishermen thrills as they wait for an explosive strike.One of these flies is the Deer Hair Mouse. It is used for bass, pike and musky fishing, wolf fish and golden dorado…There are many stories about this fly that really encourage other fishermen to try them out for trout. Bebe Anchorena, one of the first and legendary Patagonia fly fishermen, talked about these flies. He remembered that his friend Joe Brooks used to fish with deer hair bugs close to the Chimehuín River inlet and catch monstrous trout he referred to as “crocodiles”. Also, the Spanish angler Rafael del Pozo Obeso made some amazing videos showing how he caught some big ones with these flies. Great browns are caught in New Zealand when mice proliferate (surprising videos have shown trout stomachs filled with mice), an event that also happens from time to time in Patagonia.These are all great fly fishing stories and moments, and also great encouragement to try these flies by retrieving them slowly across the surface when fishing dusk or dawn hours on coastal waters of rivers and lakes.
Move the mouse over the image to zoom in the fly.
Touch the image to zoom in the fly.

List of materials
MATERIALSThread: Kevlar 6/0 or 8/0 (Uni Cord for smaller sizes).Hook: Mustad 3366 or 3367 or similar (for wolf fish or trout). Or Mustad 3407 (for larger species).Tail: fine leather strip, cut with scissors. Or synthetic chenille (vernille) with its tip burnt.Body: deer body hair.Ears (optional): same as the tail, cut in one strap by scissors.Eyes (optional): Plastic eyes (can be put together with a plastic pen tube). View more...MATERIALSThread: Kevlar 6/0 or 8/0 (Uni Cord for smaller sizes).Hook: Mustad 3366 or 3367 or similar (for wolf fish or trout). Or Mustad 3407 (for larger species).Tail: fine leather strip, cut with scissors. Or synthetic chenille (vernille) with its tip burnt.Body: deer body hair.Ears (optional): same as the tail, cut in one strap by scissors.Eyes (optional): Plastic eyes (can be put together with a plastic pen tube).
Steps
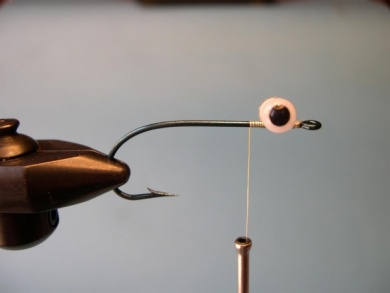
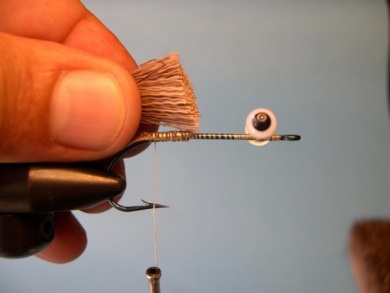
Step 1
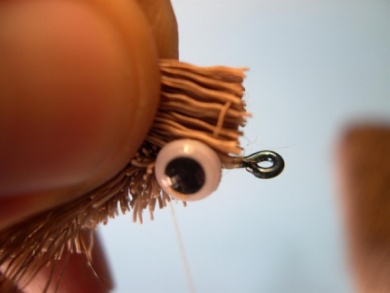
Tie the eyes close to the hook eye.
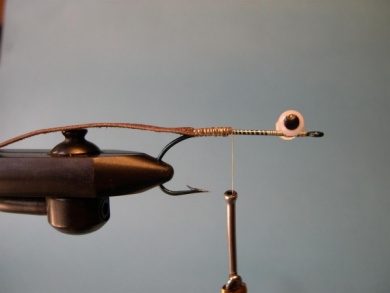
Step 2
Tie the leather strip or the vernille to make the tail.
Step 3
Tie a deer hair strip and strongly press it to the hook shank.NOTE: if you want hair tips to be a part of themouse body, these must be tied without releasing them and then shaped bytrimming only the belly section ofthe fly. If not, the hair can be shaped by trimming after turning the hair onthe hook shank. Big bunches of hair should be used, and thenstrongly compressed, so that the fly acquires great buoyancy. In case the flyis to be used underwater, bunches should be smaller and compresse View more...Tie a deer hair strip and strongly press it to the hook shank.NOTE: if you want hair tips to be a part of themouse body, these must be tied without releasing them and then shaped bytrimming only the belly section ofthe fly. If not, the hair can be shaped by trimming after turning the hair onthe hook shank. Big bunches of hair should be used, and thenstrongly compressed, so that the fly acquires great buoyancy. In case the flyis to be used underwater, bunches should be smaller and compressed softly.
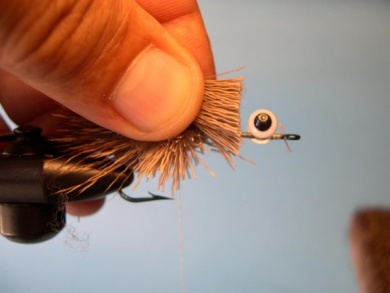
Step 4
Add hair bunches all the way up to the eyes.
Step 5
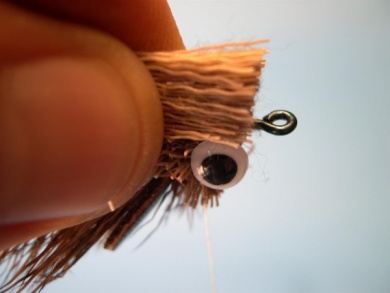
Tie the ears behind the eyes.
Step 6
Add a short bunch of hair between the ears and the eyes. This should be done without releasing it.
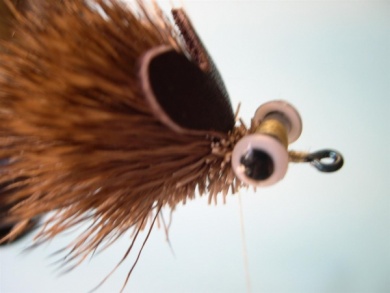
Step 7
Tie a bunch of hair (only the base section of these, not the tips) in the same spot than before but on the bellys' side.
Step 8
Tie a last bunch of base hair between the eyes and the hook eye. This time let it spin/turn so that it is used to shape the mouse snout.
Step 9
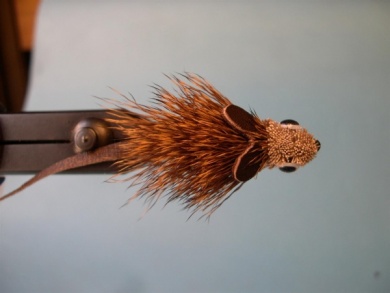
Trim with scissors to shape the belly and snout.