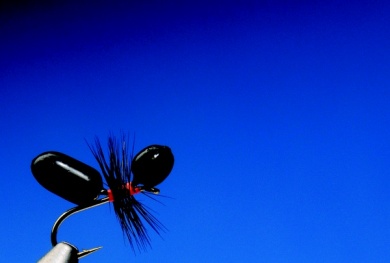
Designed to attract fish and not fishermen, Ed Surryn flies were innovative from the very moment of its appearance. They are built with balsa wood, a particularly suitable material for making bodies of terrestrial insects, which is unfortunately rare foam appeared (it is true that foam makes things View more...Designed to attract fish and not fishermen, Ed Surryn flies were innovative from the very moment of its appearance. They are built with balsa wood, a particularly suitable material for making bodies of terrestrial insects, which is unfortunately rare foam appeared (it is true that foam makes things easier, but because of the different weight and density it cannot match balsa wood for some types of fly).Flies like the Mc Murray Ant and others by Sutryn are masterpieces of simplicity, made of balsa wood cylinders joined by monofilament and painted with different colors of lacquer.Like the ant, we can create beetles, wasps, grasshoppers, stoneflies, worms, crickets, emergers and even midges. Nothing has escaped Surryn creativity, and we will definitely tie the other models soon. But today we will focus on this ant, which is unmatched in the water, without a doubt.You may wonder about the effectiveness of these flies. The writer can only say that it is amazing, even with ultra sophisticated trout.Perhaps the essential quality is its silhouette, or perhaps how they float. Another reason could be the opacity and brightness of the body, impossible to make with dubbing or other materials.The truth is that we can only guess, but these flies do their job and do it very well.
Move the mouse over the image to zoom in the fly.
Touch the image to zoom in the fly.

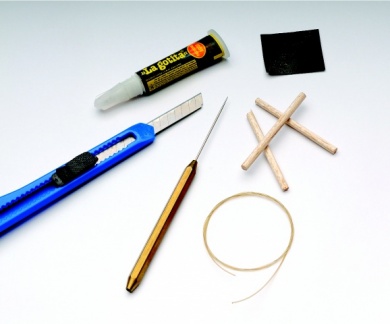
List of materials
TYING MATERIALSHook: dry fly and curved hooks like the Daiichi1170. Size according to the fly.Thread: 6/0, fluorescent orange. The originalone has black thread but this adds a special spark of life.Body: balsa wood painted with synthetic lacqueror the one used for aeromodelism. Half a litre paints 10 million ants, so it´scheapier that way.Legs: rooster or hen black/white hackle. You couldtry Starling feathers that have a metallic purple glow that is veryinteresting. View more...TYING MATERIALSHook: dry fly and curved hooks like the Daiichi1170. Size according to the fly.Thread: 6/0, fluorescent orange. The originalone has black thread but this adds a special spark of life.Body: balsa wood painted with synthetic lacqueror the one used for aeromodelism. Half a litre paints 10 million ants, so it´scheapier that way.Legs: rooster or hen black/white hackle. You couldtry Starling feathers that have a metallic purple glow that is veryinteresting.
Steps
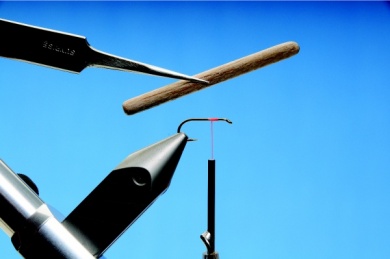
Step 2
To make the body of these ants employ balsawood cylinders, which are available in various diameters in aeromodelism shops.The one on the picture is made of sections of a balsa wood 4mm cylinder. Balsawood is very easy to model with waterproof sandpaper, even if we start with asquare rod if we do not get a cylindrical one. The picture shows how we roundedthe ends of a section of balsa before cutting the abdomen and head of our ant. View more...To make the body of these ants employ balsawood cylinders, which are available in various diameters in aeromodelism shops.The one on the picture is made of sections of a balsa wood 4mm cylinder. Balsawood is very easy to model with waterproof sandpaper, even if we start with asquare rod if we do not get a cylindrical one. The picture shows how we roundedthe ends of a section of balsa before cutting the abdomen and head of our ant.
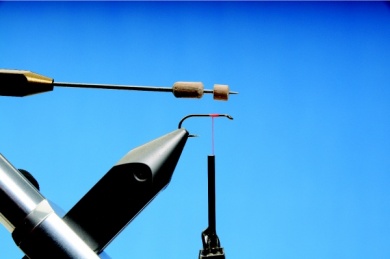
Step 3
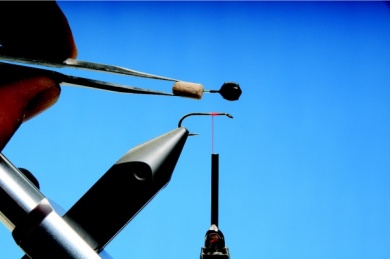
With the new cutter cut without crushing thewood, abdomen and head, we had previously rounded. The correct way is to placethe cutter on the wood, and turning while we exert slight pressure cutting thetwo sections of the ant. Once we have the two pieces, place in a needle orbodkin that has the same diameter of the monofilament that we will use (0.50mmmonofilament and number 12 hook).
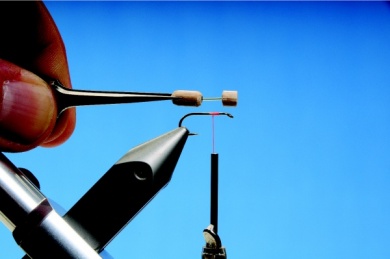
Step 4
Carefully place the little bodies in the monofilament, calculating how much space you want in the center before gluing.
Step 5
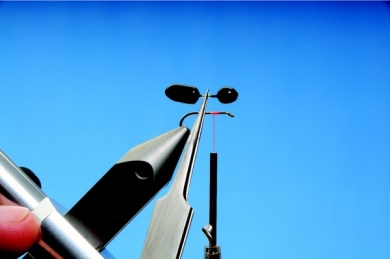
Stick the bodies with gel cyanoacrylate orepoxy, taking care that the glue gets into the bodies. It's easier with epoxy becausethe bodies can be moved rocking back and forth, ensuring complete entry of the glue.Any epoxy of 5 to 10 minutes is adequate for this bonding. It is convenient toremove the brightness of monofilament with a swipe of sandpaper for a perfectgrip and durability.
Step 6
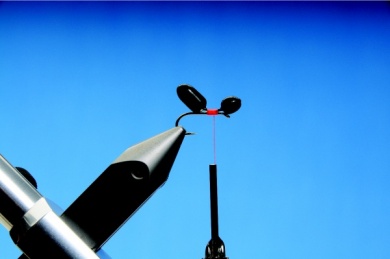
In the picture we paint only the head to makeit look better, but ideally you do it with all fly at once. The simplest thing isto give the body three or four coats of clear nail polish, and finish with acoat of lacquer of a color you have chosen. The Mc Murray Ants may be black,brown, red and even white. We may also combine colors (e.g., red head or brownand black abdomen). If painted yellow with black stripes it becomes the McMurray Yellow Jacket. View more...In the picture we paint only the head to makeit look better, but ideally you do it with all fly at once. The simplest thing isto give the body three or four coats of clear nail polish, and finish with acoat of lacquer of a color you have chosen. The Mc Murray Ants may be black,brown, red and even white. We may also combine colors (e.g., red head or brownand black abdomen). If painted yellow with black stripes it becomes the McMurray Yellow Jacket.
Step 7
The body, fully painted and ready to be tied.
Step 8
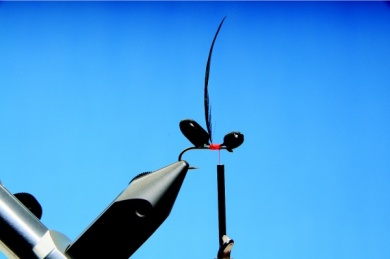
Carefully tie the preformed body taking care that the size ratio of the hook and body length is as shown in the photo.
Step 9
We place the chosen feather, withnot too long fibers (1 ½ times the hook gape as a maximum). Wrap four or fiveturns of feather, neatly cut the excess and finish the fly with a good whipfinish. A careful touch of cyanoacrylate in the thread completes a flyextremely durable and effective.