Frank Sawyer must have never imagined that this simple nymph, perfected in the River Avon, would become a classic that is included in every angler’s fly box. Sawyer wanted a nymph that made an attractive sound when reaching the water, which sunk easily and had a good silhouette for trout. He was t View more...Frank Sawyer must have never imagined that this simple nymph, perfected in the River Avon, would become a classic that is included in every angler’s fly box. Sawyer wanted a nymph that made an attractive sound when reaching the water, which sunk easily and had a good silhouette for trout. He was the first using copper wire instead of thread to tie the originals, which had no legs because they imitated baetidae nymphs and similar ones that fold their legs when swimming. The original Pheasant Tail gave birth to other versions for different waters and conditions. The slim delicate one is ideal for waters where visibility is high, where a big thick nymph wouldn’t work.
This particular pattern is for rough waters and pockets where a slimmer nymph would perhaps not be seen. Since I use it a lot, I’ve altered the tying steps so it lasts longer after bites. The rooster fibers tail is very resistant and the way the abdomen and thorax is tied towards the back, making use of ribbing to reinforce them keeps materials in its places regardless of the many trout bites. I do a similar thing with the Prince which –commercially- is tied not to last long. A longlasting fly keeps us focused on fishing, an important thing for guides.
We can tie this one with no legs if we want it to sink faster, or with fine lead turns under the peacock, the secret is to adapt it to each kind of waters. The design and shape of the hook is important in this fly to achieve the ideal silhouette and balance. My Pheasant Tails have style that’s similar to Low Water flies, with the exposed, more visible, hook on the back.
Move the mouse over the image to zoom in the fly.
Touch the image to zoom in the fly.

List of materials
MATERIALSHook: Mustad Signature 3906B, Partridge SH2, Kamasan 175, Daiichi 1560 or similar.Thread: 8/0 color rust brown.Tail: rooster fibers, coachman brown or rusty brown color.Ribbing: Gold or copper wire.Abdomen: pheasant tail fibers from the collar.Thorax: peacock fiber. From the tail feather with the eye on.Wingcase and legs: pheasant tail fibers from the collar.
Steps
Step 1
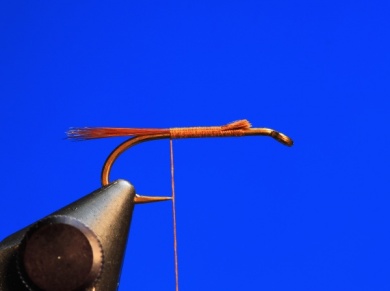
Take a rooster neck feather (coachman brown or rusty brown color), select an even bundle of fibers and tie them as shown in the picture. The rooster fibers last longer than the pheasant ones, they last as long as the fly without loosening.
Step 2
Go back towards the front with the thread as you tie the gold/copper wire making sure it remains on the opposite side of the tier.
Step 3
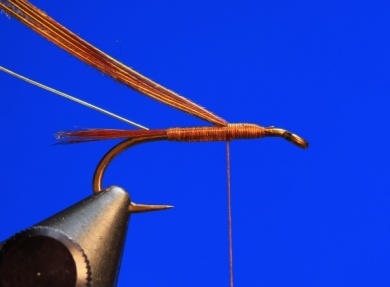
Going to the back with the thread, tie between 6 and 8 fibers of collar pheasant tail to shape the abdomen. Only enough fibers to cover the hook are needed, the abdomen must be thin. Make 2 tight turns with the wire and let it hang.Carefully wrap the fibers towards the back (clockwise) until you reach the 2 turns of wire. There, hold the pheasant fibers up with one hand, and with the other one tie half a turn with the wire (clockwise). Then, continue with the wire towards the front, tie it with View more...Going to the back with the thread, tie between 6 and 8 fibers of collar pheasant tail to shape the abdomen. Only enough fibers to cover the hook are needed, the abdomen must be thin. Make 2 tight turns with the wire and let it hang.Carefully wrap the fibers towards the back (clockwise) until you reach the 2 turns of wire. There, hold the pheasant fibers up with one hand, and with the other one tie half a turn with the wire (clockwise). Then, continue with the wire towards the front, tie it with the thread on the ventral part of the fly.
Step 4
Pheasant fibers are tied to the back and the wire towards the front, so an X shape is formed when these two cross. Trim the remains of fibers.
Step 5
Tie the peacock fiber. The right side of the feather is better because the fiber will be wrapped to-wards the back, the inclination of the fibers is best this way. Use the central part of the fiber, its denser and more iridescent. I tend to dye the peacock on magenta so it looks like bronze. If we have good peacock feathers and expose them to the sun, these will turn bronze too. It’s a superior color for this fly. View more...Tie the peacock fiber. The right side of the feather is better because the fiber will be wrapped to-wards the back, the inclination of the fibers is best this way. Use the central part of the fiber, its denser and more iridescent. I tend to dye the peacock on magenta so it looks like bronze. If we have good peacock feathers and expose them to the sun, these will turn bronze too. It’s a superior color for this fly.
Step 6
Tie the peacock fiber (clockwise) up to the abdomen with tight turns, but without pressing the fibers. Then tie the wire up to the head and get it together with the thread. The wire reinforces the abdomen and thorax, adding a spark in the abdomen but hiding the thorax, that’s ideal. Trim sharply.
Step 7
Comb the fibers to the sides and lower the wingcase tying it firmly at the front, without tying on the hook eye.Split the pheasant fibers in two equal bundles,tie one at each side of the wingcase, pointing slightly downwards. Legs shouldnot be too long, it ruins the way the fly swims and makes the sinking worst. Thehooks I use are enough weight for it to sink naturally.
Step 8
The finished Pheasant Tail.
Step 9
The finished Pheasant Tail.